
What you will learn
- Recognise parallel hatching and crossing layers while keeping individual marks visible.
- Separate the effect of line spacing from the effect of adding another layer.
- Review stroke direction and three distinct values before repeating the exercise.
How does cross-hatching create a darker value?
Norton Simon Museum explains hatching as tonal marks made with parallel lines; cross-hatching introduces lines that intersect at an angle. Spacing and line width affect the result, and strokes can curve to follow a form. Norton Simon Museum: Rembrandt and Mark Making
Value describes lightness or darkness. Getty’s teaching activity connects value with the illusion of volume and uses the pencil tip to explore hatching through parallel marks. Getty: Exploring Value to Create Form
Here, test spacing first and a second direction afterwards. Keep pressure reasonably steady so you can identify what changed. If you press harder while closing the gaps, you introduce two variables together. This is a sheet for examining decisions; it need not resemble a finished illustration or convincingly imitate metal.
Minutes 0–2: prepare two shapes
Gather unlined paper, a sharpened HB pencil, an eraser and a clean sheet to protect the drawing from your hand. A fine pen is an alternative if you are comfortable leaving permanent marks. Use one tool throughout. Make ten short strokes in the margin; adjust your grip or pressure if the point catches.
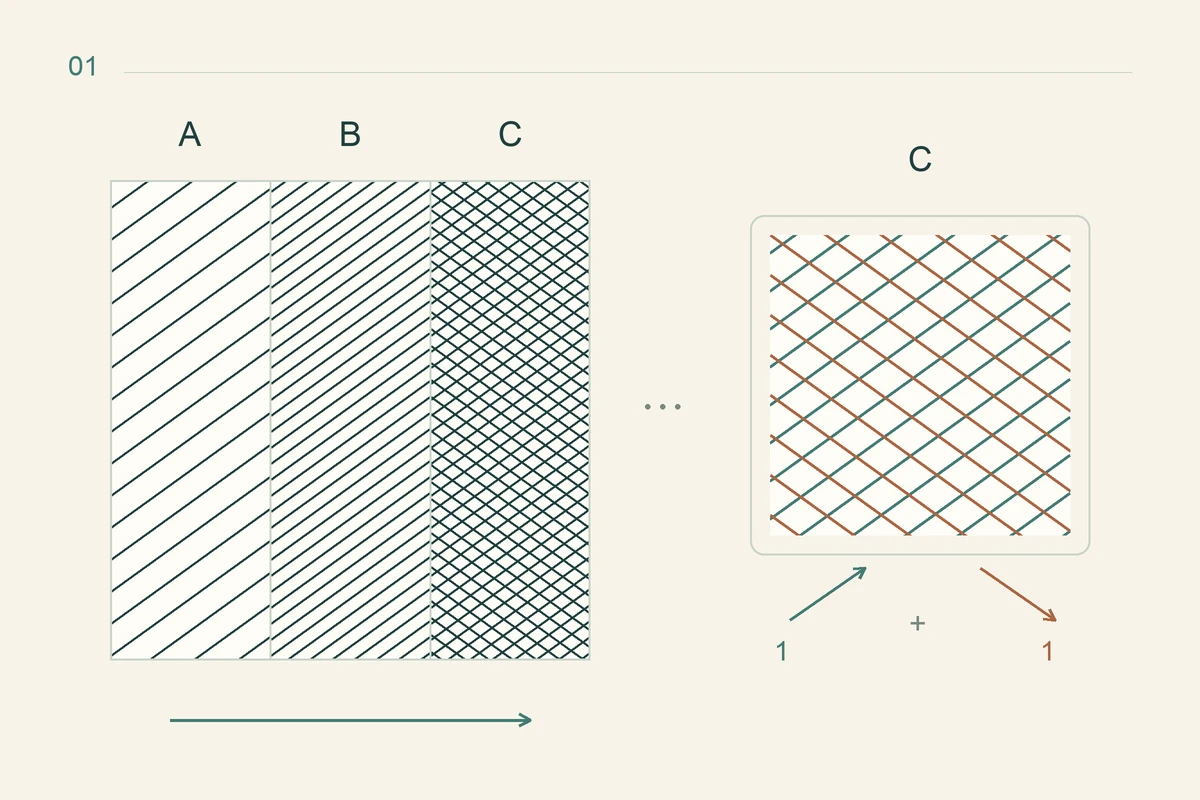
Draw a square about six centimetres across. Divide it lightly into three equal vertical bands labelled A, B and C. Beside it, draw a cylinder about six centimetres tall and four wide: an ellipse above, two sides and a lower arc. These dimensions organise the page; they are not a performance standard.
Allow two minutes to prepare, four for the square, nine for the cylinder and five to review. This timing is our editorial practice plan, so extend it when useful. Keep the outlines light, leave room for notes and draw the hatched marks freehand.
Minutes 2–6: separate spacing from layers
Lift the pencil after each stroke instead of travelling backwards and forwards over the same mark. Choose a comfortable stroke length, and turn the paper if the chosen angle strains your wrist. Add a small arrow in the margin to record the first direction.
- Fill A with parallel diagonal strokes and generous gaps. Keep their weight and length reasonably similar.
- Fill B at the same angle and pressure, reducing the gaps to roughly half those in A. Estimate rather than measuring each gap.
- Begin C like B, then add a second set at a visibly different angle. Lift the pencil between strokes.
- Compare the bands at arm’s length. Look for A to read lighter than B, and C darker than both. Record any pair that looks alike before correcting it.
Minutes 6–15: apply the decisions to a cylinder
Getty’s portrait lesson recommends practising hatching on simple volumes before attempting a face. Our cylinder study isolates stroke control with an assumed light source on the left. Getty: Portraits in Line
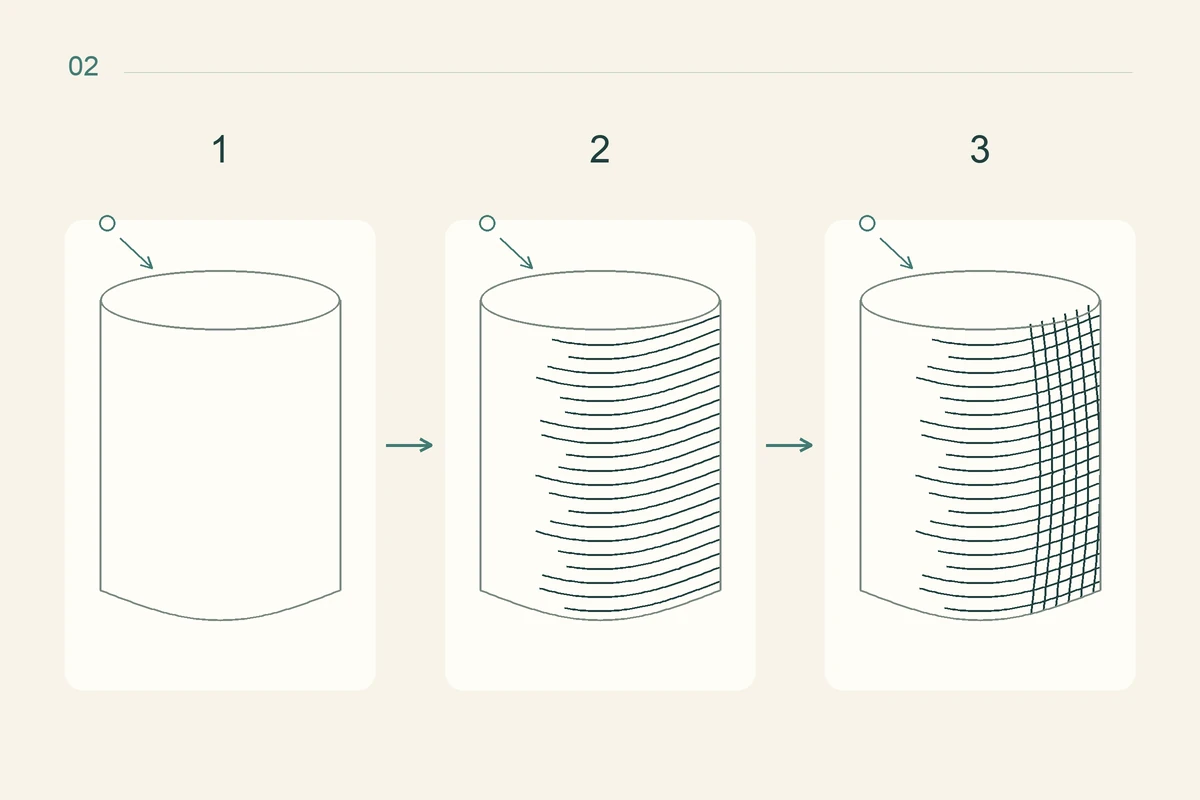
You can work from this schematic model without a real object. Keep the top quiet and concentrate on the side. Later, when drawing an actual tin, observe its illumination instead of imposing today’s dark band. Omit cast shadows and reflections here to keep the comparison focused.
- Place a light arrow to the left. Reserve a light band near that side, marking its limit with two tiny ticks outside the cylinder.
- Start on the right half with short curved strokes that suggest the surface turning. Work in small groups and check their direction between groups.
- Reduce the density towards the reserved light. Let some strokes finish earlier than others so the transition does not become a straight internal border.
- Add a crossing direction in a narrower area on the right. Keep one layer in the middle and leave the light band unhatched.
- Check the whole cylinder before adding more. When the three areas remain readable, stop; accumulating strokes is not a separate goal.
Common errors reveal which decision to change
If the cylinder looks like an evenly woven fence, check how far the second layer extends. It may cover light, middle and shadow alike. Reduce its footprint next time. If dark dots collect at stroke beginnings, practise a lighter start in the margin before returning to a small group.
Hard stripes can appear when every stroke ends along the same boundary. Stagger the endpoints while keeping the group’s direction consistent. If your hand smears the marks, move the protective sheet. Avoid fixing the whole study by rubbing it smooth: that removes the evidence you need to assess. A stray stroke outside the shape does not require a heavy outline around everything.
Minutes 15–20: check three things
First, step back: can you order A, B and C from light to dark without reading their letters? Next, look closely at the cylinder: are two stroke directions visible in the shadow and one in the middle? Finally, does the reserved light remain distinct? Tick each clear result and circle one confusing area.
Write an actionable note, such as “reduce the second layer’s area” or “leave wider gaps near the light”. Test only that adjustment in a small margin sample. Date the sheet and keep it. Use the same tool and size next session for a useful comparison, then apply the technique to a simple tin in front of you.
Frequently asked questions
Must cross-hatching meet at a right angle?
No. Choose two directions that you can distinguish easily in this exercise. Decide where the second layer belongs and why, then test a different angle in a separate sample.
Should I blend the hatching afterwards?
Leave blending aside on this sheet so you can assess individual strokes and gaps. Try it on another sample later and compare the effect without erasing your first result.
Continue learning with the academy
Choose a course for the skill you want to develop, and check its curriculum and lesson language on the course page.
- Pencil Shading — Develop pencil pressure and tonal transitions through light and shadow, portraits and still life. Lessons are in Arabic; review the curriculum for the skills you want to practise.