
What you will learn
- Use a line of action as a flexible interpretation of a pose, not an anatomical rule.
- Relate the head, shoulder tilt, pelvis and limbs before drawing details.
- Assess the pose through its direction, contact points and overall readability.
What does gesture drawing record?
The New Mexico Museum of Art describes gesture drawing in terms of movement, basic shapes and weight. Its activity asks the learner to notice angles and curves before concentrating on the outline. New Mexico Museum of Art: Gesture Drawing
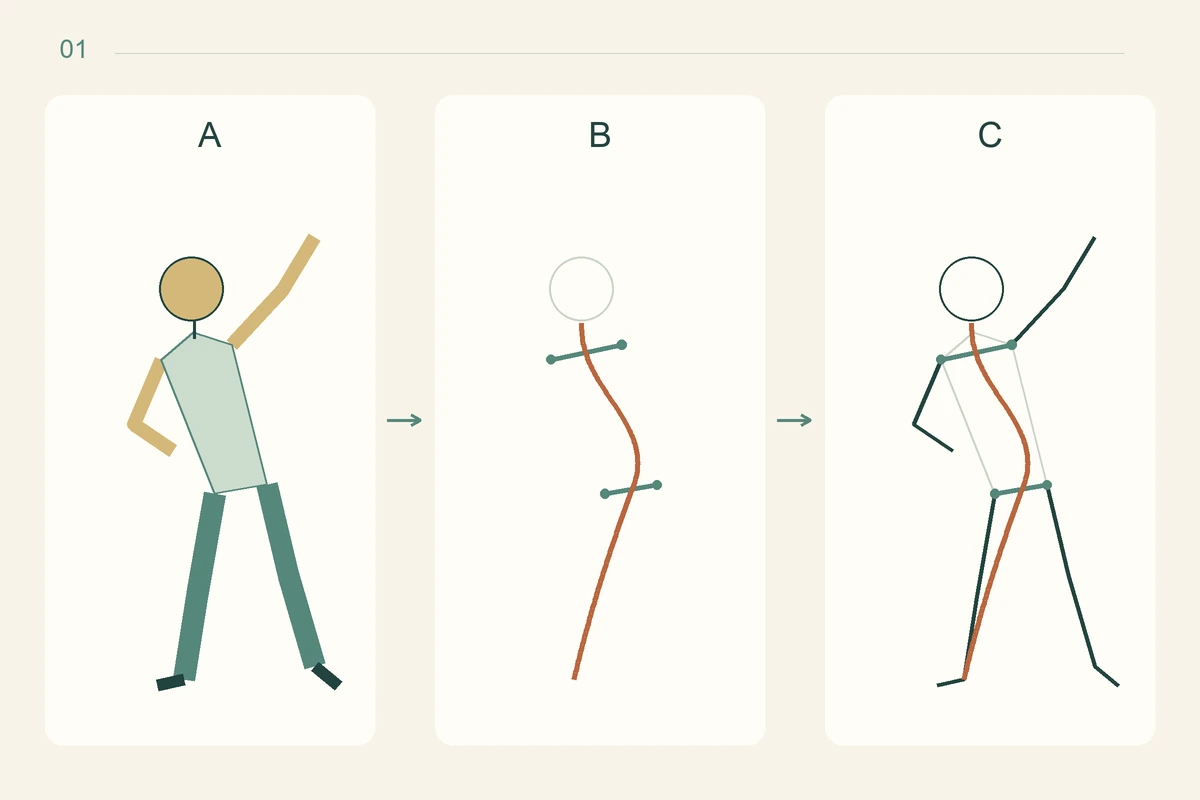
For today’s sheet, a line of action means a long, simple mark that suggests the pose’s main direction. It might be curved, nearly straight or accompanied by another line. It does not have to run through every joint, and it is not a medical diagram of the spine. Two useful sketches may interpret the same pose differently.
Choose a visible action rather than an emotion you cannot verify: reaching towards a shelf, sitting forward to read, or standing with one hand on a table. Ask where the head is directed and how the torso responds. Leave eyes, clothing patterns and individual fingers for a later study.
Prepare a reference and a twelve-minute sheet
Use unlined paper, an HB or 2B pencil and a timer. Divide the sheet into six generous spaces. Pick a clear photograph you made yourself, a consenting clothed model in a comfortable pose, or the original diagrams in this guide. Do not ask anyone to hold an uncomfortable position for the drawing.
Choose a viewpoint where the torso and at least one supporting contact are visible. A simple seated pose is as useful as a dramatic standing one. If you use a photograph, keep it fixed during the first group of studies. This makes your decisions easier to compare than changing both the pose and the method each time.
Allow two minutes to observe, four one-minute sketches, one three-minute redraw and three minutes to review: twelve minutes in total. These times are our suggested practice plan. Extend them, enlarge the marks or use a digital brush if that makes the exercise more accessible. Speed is a constraint for choosing information, not a test of your worth.
Make four one-minute sketches
Getty’s quick gesture activity uses the head, torso tilt and the locations of the shoulders and hips to organise a figure, before adding expressive limbs. Our exercise below uses those relationships within a different timed practice plan. Getty Museum: Create a Quick Gesture Sketch
Spend the first few seconds looking. Name the visible action in two or three words, then begin with a light mark. Keep the whole figure on the page. When the minute ends, move to the next space instead of polishing the last hand or shoe.
- Sketch the head as a small oval and draw one long line suggesting the overall direction of the pose. Choose its sweep from the reference, rather than automatically drawing an S.
- Add a short shoulder line and a short pelvis line. Compare their angles with each other and with the page edge. They need not tilt in opposite directions.
- Indicate the arms and legs with a few linked strokes. Mark the main bends and the visible contacts with a seat, floor or other support. Keep these marks simple.
- In each new space, adjust one decision: the main curve, the torso tilt, the reach of an arm, then the placement of a supporting contact. Observe the same pose again before every attempt.
Observe support without turning it into a formula
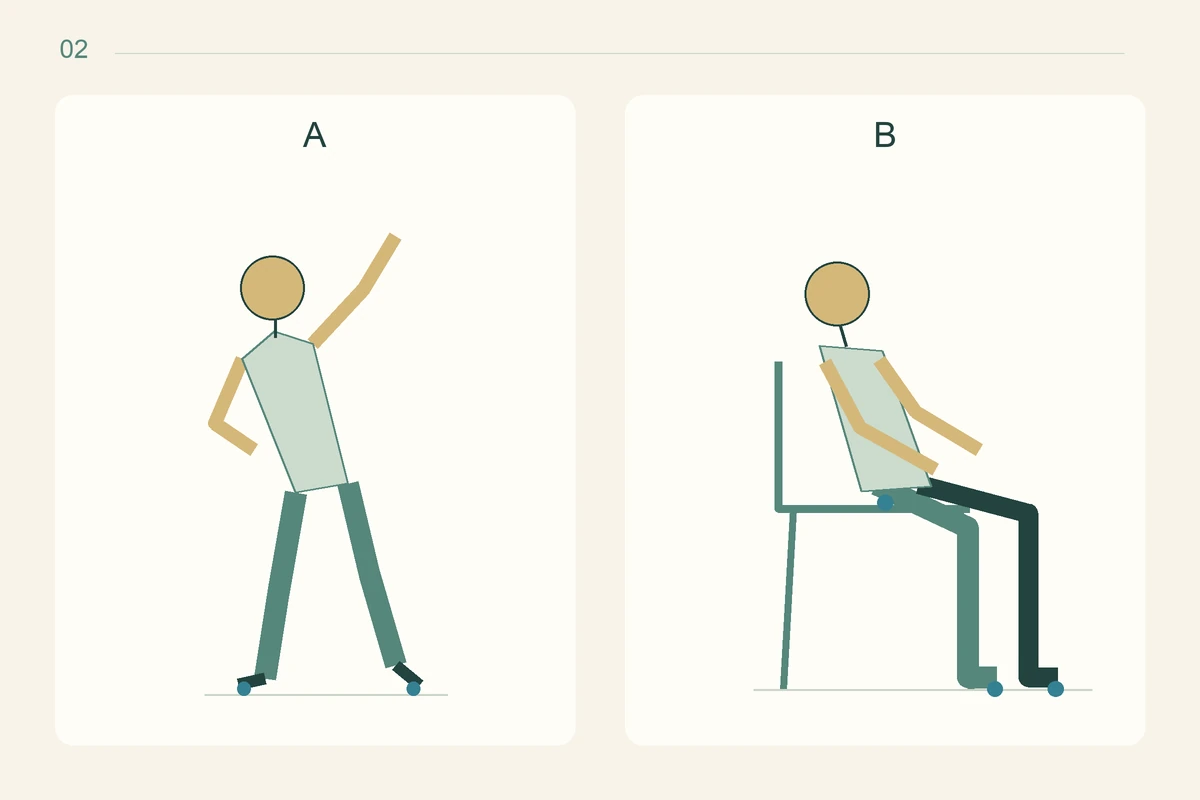
Look for the places where the figure meets its surroundings. A seated person may be supported by the chair as well as the feet; someone leaning on a table may also use a hand. Put small marks at the contacts you can actually see. They help you relate the figure to a surface instead of leaving it floating.
Do not assume that the body must always align over one foot. A walking image records a moment in motion, and a cropped photograph may conceal important support. For this first exercise, a quiet supported pose makes the comparison easier. The blue markers in our second diagram identify contacts only; they are not measurements of forces or a balance test.
Compare lengths and angles within the individual reference. People have different proportions, ranges of movement and ways of standing or sitting. A fixed number of heads or a symmetrical silhouette will not describe everyone. Aim to preserve the particular pose you are observing, including any visible mobility aid that helps explain it.
Develop one study for three minutes
Choose the sketch whose action you can read most clearly. Redraw it larger in the fifth space, looking at the reference again. Add a simple torso mass and a smaller pelvis mass around the directional marks. Let the original gesture remain visible while you check how the parts connect.
Notice the space between an arm and the torso, or between the two legs. Does its shape agree with your reference? Use that gap as a second check on an uncertain limb. If the pose loses its direction as you add volume, pause and compare the larger drawing with the quick study rather than adding more outlines.
Use a slightly darker mark only for the choice you want to keep. Leave exploratory lines light. At this stage, a hand can remain a small shape and a foot a short wedge. Finish when head direction, torso tilt and support are reasonably clear; shading and clothing details are separate tasks.
Review three decisions, then change one
Cover the reference briefly and look at your sketches at arm’s length. Can you describe the action from the marks alone? Uncover it and compare the head-to-torso direction, the shoulder and pelvis angles, and the positions of the supporting contacts. Select one convincing relationship and one that needs another attempt.
If the figure is stiff, check whether every segment became vertical. If it seems rubbery, check whether you curved every limb without observing its bends. If it drifts across the page, compare the placement of its contacts. Repeated dark scratching can hide these decisions; a new light study is often easier to evaluate than a heavily corrected one.
Write a specific next step, such as “move the seated pelvis back towards the chair” or “keep the raised arm’s angle.” Use the final minute of your three-minute review to repeat the pose in the sixth space with that single change. Date the sheet and retain both versions. In the next session, try another everyday pose and compare how your selection of marks changes, without expecting every sketch to become a finished character.
Frequently asked questions
Is gesture drawing the same as drawing an outline?
The exercises have different priorities. Here, you select directional relationships across the figure; a contour study concentrates on boundaries. Both can be useful, but a complete silhouette is unnecessary for this practice sheet.
Must a beginner finish a pose in thirty seconds?
No. Begin with the suggested minute or extend it. Keep the task limited to a few relationships, then shorten the time only if it helps you make clearer choices without discomfort.
Continue learning with the academy
Choose a course for the skill you want to develop, and check its curriculum and lesson language on the course page.
- Fundamentals of Drawing Faces and Characters — Continue with the course’s body, movement and cartoon-character studies. Its lessons are recorded in Arabic; the English course page explains the curriculum and does not imply English audio is available.